

Welcome, fellow gamers and tech enthusiasts! Today, we’re diving into the exciting world of setting up your very own dedicated Satisfactory server on Ubuntu 22.04, with tips on choosing the best VPS hosting Canada offers for a seamless experience. If you’ve been itching to create your own playground in this fantastic game, you’re in the right place. Let’s embark on this journey together!
Before we begin, it’s important to note that running a dedicated server for Satisfactory not only enhances your gaming experience but also allows you to invite friends and fellow gamers to join you in your industrial adventures. Plus, it’s a fantastic way to learn more about server management and Linux operating systems.
So, grab your hard hat and let’s get started! Follow along as we explore the step-by-step process of setting up your dedicated Satisfactory server on Ubuntu 22.04. From installation to configuration, we’ll cover everything you need to know to get your server up and running smoothly.
But wait, what exactly is Satisfactory? For those who may be new to the game, Satisfactory is a first-person factory building game developed by Coffee Stain Studios. It’s all about exploration, automation, and, you guessed it, building massive factories to fulfill your industrial dreams. Whether you’re mining resources, constructing intricate production lines, or optimizing efficiency, Satisfactory offers endless possibilities for creative minds.
Now that we’re all on the same page, let’s roll up our sleeves and dive into the exciting world of setting up our dedicated Satisfactory server. Get ready for an adventure filled with fun, learning, and maybe a few surprises along the way.
Stay tuned as we continue our journey towards creating the ultimate Satisfactory server experience on Ubuntu 22.04. The fun is just beginning!
Preparing the Ubuntu Server
To kick off the installation, you’ll need to have an Ubuntu 22.04 server with SSH access (via command line). For optimal performance, consider Canada VPS hosting options that provide reliable and high-performing services.. For those who don’t yet have a dedicated server, we invite you to explore our remarkable virtual servers, a reliable and high-performing alternative.
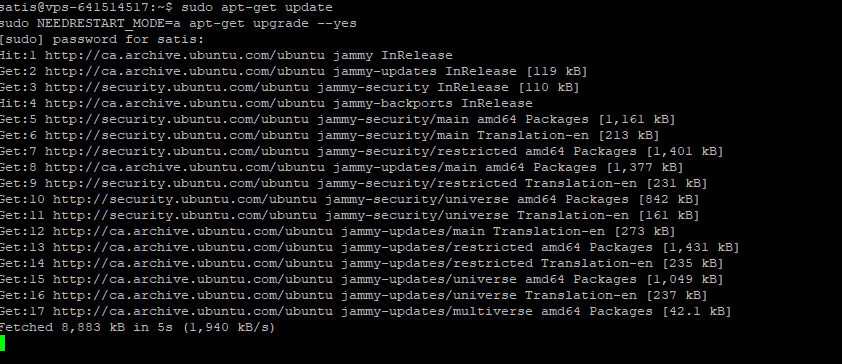
Before we begin, it’s essential to ensure that all updates are installed on your server. Here are the commands to execute to update your system:
sudo apt-get update
sudo NEEDRESTART_MODE=a apt-get upgrade --yes
Adding NEEDRESTART_MODE=a allows for automatically restarting the server services that have been updated.
I recommend restarting the server after performing the updates. This restart will ensure that all updates have been successfully applied.
Note: When you enter the “sudo” command for the first time in the session, the server will prompt you to enter the administrator password.
Adding Some Security
Once your server is up to date, it’s imperative to apply a minimum level of security. Although this section is optional, it’s highly recommended to ensure the protection of your system and data.
Step 1: Change the Default SSH Service Port
By default, a server’s SSH service is on port number 22. This means that the majority of hackers will attempt to exploit this port. Fortunately, it’s straightforward to change the default port on a Linux server.
- Open the SSH service configuration file by running the following command in your terminal:
sudo nano /etc/ssh/sshd_config
- Navigate to the line in the file where the port number is specified. You can use the arrow keys on your keyboard to navigate through the file.
- Replace the default port number (22) with the new port of your choice. For example, for this tutorial, let’s change port 22 to port 22222.
- Save the changes by pressing Ctrl + O, then press Enter. Then, press Ctrl + X to exit the Nano editor.
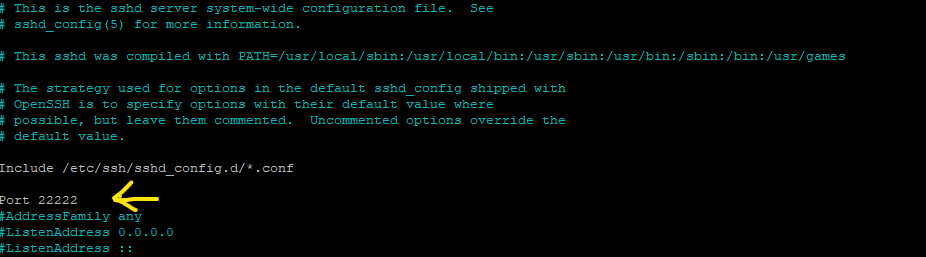
Now, your server is using a custom SSH port (in our example, port 22222) rather than the default port, which greatly reduces the risk of unauthorized access.
Step 2: Configuring the Firewall
Now, it’s time to configure the firewall to limit access to your server. We’re going to add four rules to the firewall.
- Block all incoming connections to the server:
sudo ufw default deny incoming
- Allow all outgoing connections from the server:
sudo ufw default allow outgoing
- Allow connection to the server via SSH:
sudo ufw allow 22222/tcp
Note: Be sure to replace 22222 with the custom SSH port you have configured.
- Open the necessary ports for Satisfactory to function properly:
sudo ufw allow 7777/udp
sudo ufw allow 7777/tcp
sudo ufw allow 8888/tcp
Now that the firewall configuration is complete, it’s important to restart the SSH service and the firewall in a specific order to avoid locking yourself out of the server.
- Close the firewall:
sudo ufw disable
- Restart the SSH service (you may need to reconnect via SSH after this):
sudo service sshd restart
- Open the firewall again:
sudo ufw enable
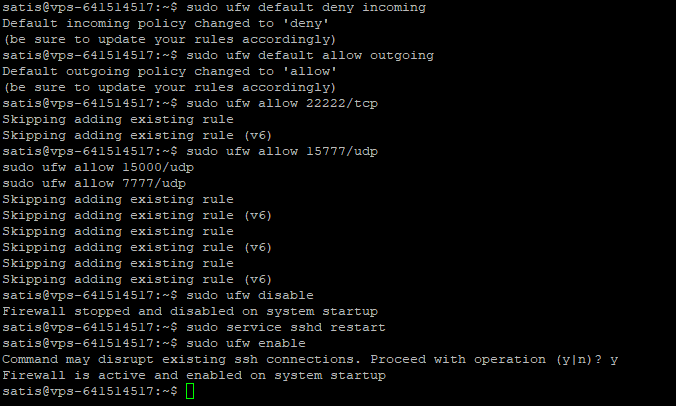
This ensures that your firewall is properly configured to restrict unauthorized access to your server while allowing the necessary connections for the Satisfactory game.
Step 3: Configuring System Log Monitoring
System log monitoring is essential for detecting and responding to suspicious activities on your server. Here’s how to set up a system log monitoring:
- Install and Configure Fail2Ban:
Fail2Ban is an intrusion prevention tool that analyzes system logs and automatically bans IP addresses that have shown signs of malicious activity. To install it, run the following command:
sudo apt install fail2ban
- Configure Fail2Ban:
After installation, you can configure Fail2Ban rules by editing the configuration file /etc/fail2ban/jail.conf. You can specify settings according to your specific needs, such as the number of allowed unsuccessful login attempts before banning.
- Restart Fail2Ban:
After configuring Fail2Ban, restart the service to apply the changes and ensure the service is active upon reboot by executing the following commands:
sudo systemctl restart fail2ban
sudo systemctl enable fail2ban
- Check Fail2Ban Status:
You can check the status of Fail2Ban to ensure it’s working correctly by running the following command:
sudo systemctl status fail2ban
Fail2Ban is now operational and monitoring system logs to detect and respond to suspicious activities on your server.
This step adds an additional layer of security by monitoring abnormal activities on your server and taking measures to counter them.
Preparing for the Satisfactory Server
Now that your server is secure, you’re ready to install SteamCMD. This application is essential as it will allow us to download and install the dedicated Satisfactory server.
Before starting the SteamCMD installation, we need to ensure that all necessary prerequisites are installed on your system. This includes configuring the multiverse repository, adding the i386 architecture, and updating the system.
To do this, run the following command in your terminal:
sudo add-apt-repository multiverse; sudo dpkg --add-architecture i386; sudo apt update
This command will add the “multiverse” repository required for the installation of certain packages, configure the i386 architecture required by “SteamCMD,” and update the list of available packages on your system.
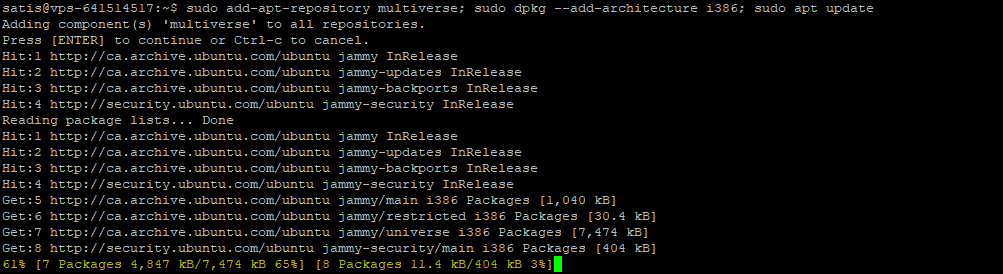
Once this step is complete, you will be prompted to confirm the installation of the prerequisites. Press the Enter key to continue.
Installing the Satisfactory Server
Now that SteamCMD is installed, we can proceed with the installation of the Satisfactory server. Before proceeding, make sure you have accepted the SteamCMD’s terms of use during its installation.
- Install SteamCMD:
sudo apt install steamcmd
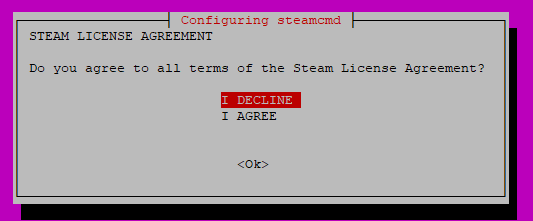
During the installation, you will be prompted to accept the Steam terms of use. Use the TAB key to move the cursor to “OK” and press Enter to accept the license.
- Download and Install the Satisfactory Server:
Now that SteamCMD is installed, we can proceed with the installation of the Satisfactory server. Note that it is not necessary to be logged in to a Steam account to perform this download.
steamcmd +force_install_dir ~/SatisfactoryDedicatedServer +login anonymous +app_update 1690800 -beta experimental validate +quit
This command will download and install the Satisfactory server into the directory ~/SatisfactoryDedicatedServer on your server.
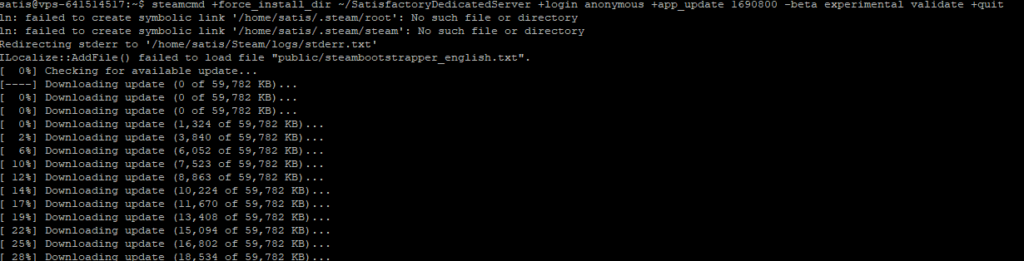
Make sure to let the process complete entirely before moving on to the next step.
Creating the Satisfactory Server
Using a service allows the Satisfactory server to automatically start when your Ubuntu server boots up. Additionally, the service will also handle updating the Satisfactory server upon startup.
- Create the Service File:
Start by creating the service file by executing the following command in your terminal:
sudo touch /etc/systemd/system/satisfactory.service
- Configure the Service:
Next, open the service file with a text editor. For example, you can use Nano:
sudo nano /etc/systemd/system/satisfactory.service
- Configure the Service:
Copy and paste the following configuration block into the file. Make sure to modify the IP address “0.0.0.0” to your server’s IP address. Additionally, it’s important to change “USER” to your own user.
[Unit]
Description=Satisfactory dedicated server
Wants=network-online.target
After=syslog.target network.target nss-lookup.target network-online.target

[Service]
Environment="LD_LIBRARY_PATH=./linux64"
ExecStartPre=/usr/games/steamcmd +force_install_dir /home/USER/SatisfactoryDedicatedServer +login anonymous +app_update 1690800 validate +quit
ExecStart=/home/UTILISATEUR/SatisfactoryDedicatedServer/FactoryServer.sh -Port=7777 -ReliablePort=8888 -log -unattended -multihome=0.0.0.0
User=USER
Group=USER
StandardOutput=journal
Restart=on-failure
WorkingDirectory=/home/USER

[Install]
WantedBy=multi-user.target
- Update the Service List and Enable the Satisfactory Service:
Finally, update the list of available services and enable the Satisfactory service by executing the following commands:
sudo systemctl daemon-reload
sudo systemctl enable satisfactory
sudo systemctl start satisfactory
Your Server is Ready for Exciting Adventures!
Congratulations! You’ve now set up a secure and configured server ready to host thrilling Satisfactory sessions with your friends. For those looking for the best VPS hosting Canada has to offer, remember that reliable hosting ensures your server runs smoothly and efficiently. Thanks to your hard work and these clear, detailed steps, your server is primed to be pushed to its full potential.
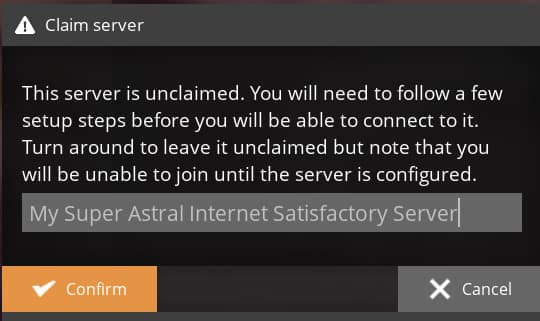
Before diving into the game, take a moment to explore the “Server Manager” menu where you can finalize your server’s configuration by adjusting settings to your preferences and customizing your gaming experience.
When connecting to your server for the first time from the game, you’ll need to give it a name and assign a password. This is an important step if you don’t want just anyone to join!
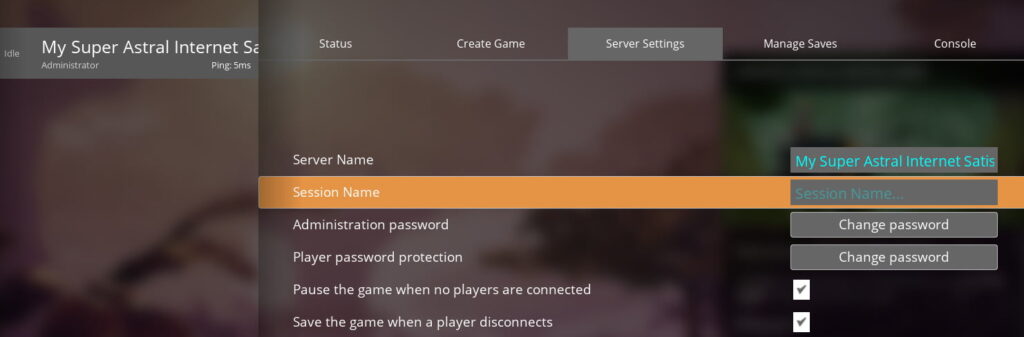
These details can be modified anytime while connected by accessing the “Server Settings” tab.
One last step before inviting your friends: you’ll need to start a new game or import an existing one to begin the adventure together.
Launch the game, invite your friends, and embark on an epic industrial journey in the world of Satisfactory! Make the most of your dedicated server and may the most magnificent constructions reign supreme. Let the fun begin!
Leave a Reply