
Until now, every change — creating a mailbox, configuring SPF, adding an alias — required navigating through a separate administration panel. That’s now a thing of the past.
Your email hosting is now fully managed directly from your usual client area. Addresses, forwards, DKIM, ActiveSync, passwords — everything is accessible in just a few clicks, all from a single interface.
This guide shows you exactly how to use each feature, in a logical order. Whether you’re setting up your domain for the first time or adding a mailbox for a new employee, you’ll find step-by-step instructions here.
Your dashboard: understand what’s happening at a glance
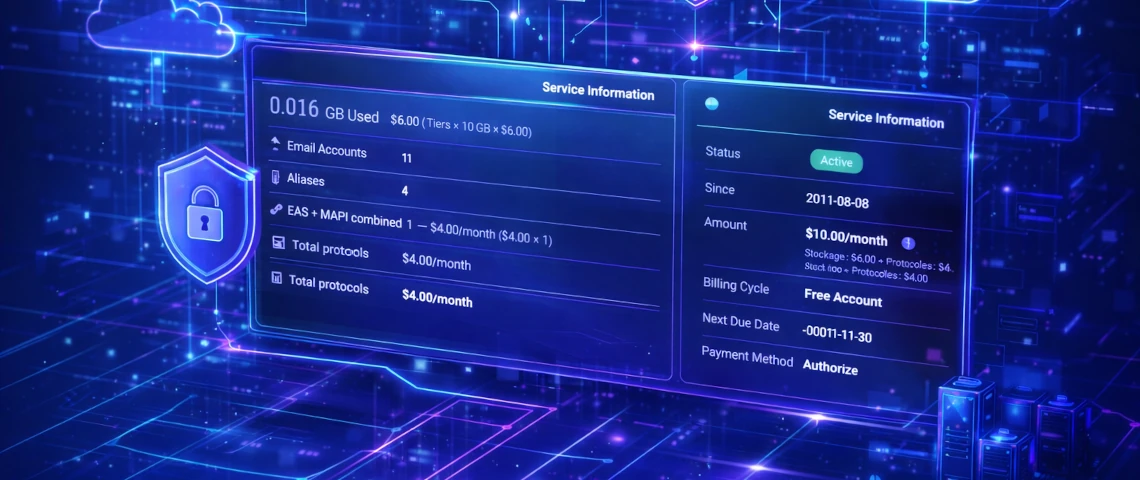
As soon as you open your email hosting service in your client area, you land on the dashboard. It’s your control centre: everything is visible at a glance, without having to dig around.
What it displays:
- Usage statistics: disk space used, number of active mailboxes, aliases, ActiveSync accounts, and MAPI accounts.
- SPF status: a green indicator means your DNS record is properly configured; red means action is required on your end.
- DKIM status: shows whether the cryptographic signature is active and detected in your DNS.
- Billing overview: estimated cost for the current period, including EAS and MAPI fees per mailbox.
- Complete list of all your email addresses and forwards, with search and filtering options.
Good to know: If you’ve just updated a DNS record (SPF, DKIM) and the status hasn’t changed yet, give it some time — DNS propagation can take up to 48 hours depending on your registrar. Check back on the dashboard after this delay.
Configure SPF to prevent your emails from ending up in spam
Why SPF is essential
SPF (Sender Policy Framework) is a DNS record that tells other mail servers: “Here is the list of servers authorized to send emails on behalf of my domain.” Without it, anyone can spoof your address — and Gmail, Outlook, and other major providers know it. The result: your legitimate messages are automatically flagged as suspicious.
Properly configuring SPF is the first thing you should do when activating a new domain.
Check your SPF status in 10 seconds
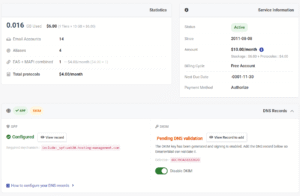
On the dashboard, locate the SPF section. There are two possible states:
- ✅ Configured: your record already includes the mechanism required by our server. No action needed.
- ❌ Not configured: the record is missing or incomplete. Click View record or What needs to be configured? for details.
Steps to configure SPF
- Click View record in the SPF section.
- A window will display the exact TXT record to add at your registrar.
- Log in to your domain’s DNS zone.
- No existing SPF record? Add a TXT record with the provided value.
- An SPF record already exists? The system will let you know. Update the existing record to include the required mechanism — only one SPF record is allowed per domain.
- Save your changes and wait for propagation (up to 24 hours).
⚠️ Important rule: Never create two separate SPF records on the same domain — this will invalidate both. If you already have something like: v=spf1 include:otherdomain.com ~all you must modify it to include our mechanism: v=spf1 include:otherdomain.com include:ourserver.com ~all
Enable DKIM to authenticate your outgoing emails
What DKIM actually changes
DKIM (DomainKeys Identified Mail) adds an invisible digital signature to every message sent from your domain. The receiving server checks this signature to confirm two things: the message действительно comes from you, and it hasn’t been altered in transit.
Without DKIM, even with a perfect SPF setup, your messages can still be flagged as suspicious by Gmail, Outlook.com, or Hotmail. With SPF + DKIM, you get the best possible deliverability without any additional configuration.
Enable and configure DKIM from the dashboard
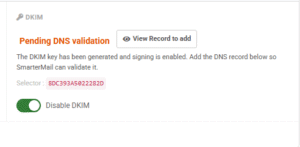
If DKIM is not yet active:
- Locate the DKIM Key section on the dashboard.
- Click Enable DKIM — the cryptographic key is generated automatically.
- Then click View DNS record.
- A window will display two values to copy into your registrar:
- Host (Name): usually in the format
mail._domainkey.yourdomain.com - Value (TXT): a long string starting with
v=DKIM1; k=rsa; p=...
- Host (Name): usually in the format
- Create a TXT DNS record using these two values.
- Wait for propagation. The dashboard will switch to Active as soon as the record is detected.
If DKIM is already active:
The dashboard will indicate it. You can view the DNS values at any time by clicking View DNS record — useful if you change registrars or need to reconfigure your DNS zone.
Disable DKIM
The Disable DKIM button is available and requires confirmation. The effect is immediate: your messages will no longer be signed once it’s turned off.
Recommendation: Set up SPF and DKIM together, once and for all. These two steps permanently protect your sender reputation and improve the deliverability of every email you send.
Mailbox or standalone forward — which should you choose?
Before creating anything, take 30 seconds to pick the right type. This table sums up the differences:
| Mailbox | Standalone Forward | |
|---|---|---|
| Has an inbox | ✅ Yes | ❌ No |
| Can send emails | ✅ Yes | ❌ No |
| Uses disk space | ✅ Yes | ❌ No |
| Webmail access | ✅ Yes | ❌ No |
| ActiveSync / MAPI | ✅ Yes | ❌ No |
| Typical use case | Employee, department | info@, contact@, support@ |
Choose a mailbox when:
- A real person needs to read, archive, and reply to messages.
- You need access from Outlook, an iPhone, an Android device, or webmail.
Choose a standalone forward when:
- You want to centralize multiple addresses into a single destination without creating extra mailboxes.
- The address is generic and simply needs to route emails to one or more existing mailboxes.
- You don’t want to use additional disk space on the server.
Create a professional email mailbox
From the dashboard, click New email address. You’ll be taken to the creation form.
Fields to complete:
- Username — the part before the @. Letters, numbers, dots, hyphens, and underscores only.
Example:marie.dupontwill createmarie.dupont@yourdomain.com. - Password — click Set password to open the dedicated module. Security requirements are displayed in real time as you type. You can also use the built-in generator to create a strong password in one click.
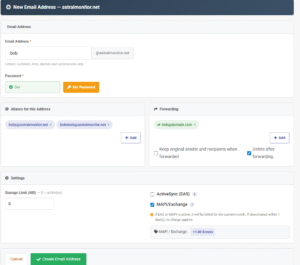
Add aliases to an address
An alias is a secondary name that points to the same mailbox. If you create marie@yourdomain.com with the alias m.dupont, emails sent to m.dupont@yourdomain.com will arrive in the exact same inbox.
When should you use an alias?
- A person is known by multiple names or spellings.
- You want a shorter version in addition to the official address.
- An old name needs to remain functional after a change (employee turnover, name change, etc.).
How to add an alias during creation:
In the Aliases for this address section, type the desired name in the field and click +. Each alias appears as a tag that you can remove by clicking the ×. You can add as many as needed.
Important: An alias is not an independent mailbox. It has no storage space and no password of its own. If you delete the main mailbox, all associated aliases are deleted as well.
Set up automatic email forwarding
The Forwarding section allows you to automatically send incoming messages to one or more external addresses. This is useful for monitoring a business mailbox from a personal address, or for notifying multiple people when a message is received.
Add destination addresses:
Enter each forwarding address in the designated field and click +. You can add as many as needed.
The two forwarding options:
Two checkboxes are available in this section. They have different and important effects:
- Delete after forwarding: When enabled, messages are removed from the mailbox as soon as they are forwarded. No copy is kept on the server. This is useful for saving space if you read everything from the destination address.
- Keep original sender and recipients: When enabled, the forwarded message retains the original sender’s information in the headers. This allows you to reply directly to the original sender from your destination mailbox. If disabled, replies will be sent to your own mailbox instead of the original sender.
- Conserver l’expéditeur et les destinataires d’origine : quand cette option est activée, le message transféré conserve les informations de l’expéditeur original dans les en-têtes. Vous pouvez alors répondre directement à cet expéditeur depuis votre boîte de destination. Si elle est désactivée, la réponse sera adressée à votre propre boîte plutôt qu’à l’expéditeur du message.
- Supprimer après transfert : quand activée, les messages sont effacés de la boîte dès qu’ils sont transférés. Aucune copie n’est conservée sur le serveur. Utile pour économiser de l’espace quand vous lisez tout depuis la destination.
Tip: Leave Delete after forwarding disabled until you’ve confirmed that forwarding is working properly. You can always enable it later from the edit page.
Set a disk space limit
The Disk space limit (MB) field deserves a quick explanation, especially if your plan is described as “unlimited.”
In our hosting offer, “unlimited” means there is no fixed global cap imposed on your domain, but billing is based on the actual space used. A mailbox that grows without restriction can therefore increase your monthly cost without you noticing.
Why set a limit per mailbox?
Setting a per-mailbox limit protects you from two situations:
- Unexpected cost increases: An employee accumulating gigabytes of emails (and attachments) can quickly drive up costs. An individual limit caps the impact of each mailbox on your overall bill.
- Spam overload: A mailbox with no limit that receives a large volume of spam can grow indefinitely and affect the performance of your entire domain.
Enter 0 to leave the mailbox without an individual limit (it will only be constrained by your plan’s overall limit), or specify a value in megabytes based on your needs. Examples: 10240 for 10 GB and 5120 for 5 GB.
Enable ActiveSync (EAS) or MAPI/Exchange
These two options determine how your devices and software connect to the mailbox. They are optional and can be enabled or disabled at any time, even after the mailbox has been created.
ActiveSync (EAS): full mobile synchronization
ActiveSync allows an iPhone, Android phone, or tablet to automatically sync with the mailbox in real time. This includes:
- Tasks
- Emails (instant delivery, synced folders)
- Contacts
- Calendars
This goes beyond a standard IMAP setup, which only syncs emails.
Enable EAS when:
- The user checks email from a mobile device
- You want contacts and calendar events synced to the phone
- You’re looking for a simple mobile setup without manual IMAP configuration
MAPI/Exchange: for Microsoft Outlook
MAPI is Microsoft Outlook’s native protocol. It offers much deeper integration than a standard IMAP account configured in Outlook:
- Full sync of emails, contacts, calendars, and tasks
- Support for meeting invitations and automatic replies
- Access to shared folders
- Synchronization of mail rules created in Outlook
Enable MAPI when:
- The user primarily uses Microsoft Outlook
- You need advanced Exchange features (meetings, shared folders, rules)
- You’re migrating from an Exchange server and want a similar experience
EAS, MAPI, or both?
| Situation | Recommendation |
|---|---|
| Mobile only (iPhone / Android) | EAS |
| Microsoft Outlook on PC | MAPI |
| Mobile + Outlook | EAS + MAPI |
| Webmail only | Neither |
| Thunderbird, Apple Mail, Outlook (IMAP) | Neither |
See also: Everything you need to know about email protocols: IMAP, POP3, and SMTP
Billing note: EAS and MAPI are billed per active mailbox, per billing cycle. The details are always visible in the billing section of your dashboard. A discounted combined rate is available when both protocols are enabled on the same mailbox — check your dashboard for exact pricing.
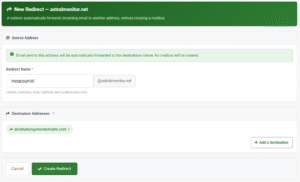
Create a standalone email forward
A standalone forward is an address without an inbox. It receives messages and immediately forwards them to one or more destinations. Nothing is stored on the server.
Practical examples:
orders@yourdomain.com→ forwarded to your management softwareinfo@yourdomain.com→ forwarded tomarie@gmail.comandjean@gmail.comcontact@yourdomain.com→ forwarded to your main mailbox
How to create one:
- From the dashboard, click New forward.
- Enter the address name — the part before the @ (examples:
info,contact,support). - In the Destination addresses section, add each target address using the + button.
- You can add multiple recipients. Click Create forward.
Difference from mailbox forwarding: A standalone forward does not include the options Keep original sender or Delete after forwarding. These options only apply to mailboxes that have a real inbox on the server.
Edit an existing mailbox
Locate the address in the dashboard list and click on its name or the edit icon. From this page, you can adjust:
- Disk space limit: increase or decrease the value at any time.
- Aliases: add new ones or remove existing ones. Note that a removed alias is not immediately available for another mailbox — a short propagation delay may apply.
- Automatic forwarding: add or remove destination addresses, and adjust the options (keep original sender, delete after forwarding).
- ActiveSync (EAS): enable or disable mobile synchronization.
- MAPI/Exchange: enable or disable Outlook connection in Exchange mode.
Click Save when you’re done. Changes are applied immediately on the server side.
Change a mailbox password
Password changes are handled in a dedicated module — you can’t accidentally modify it while saving other settings.
Procedure:
- Open the edit page of the desired mailbox.
- Click Change password — a window will open. Enter the new password.
- The requirements are displayed in real time:
- ✅ Minimum length met
- ✅ At least one uppercase letter
- ✅ At least one number
- ✅ At least one special character (
!@#$%^&*-_=+) - ✅ Does not contain the username
- ✅ Does not contain the domain name
- ✅ Both fields match
- The confirmation button will only be enabled once all criteria are met.
- Click Change password to confirm.
Tip: Use the built-in generator to create a strong password effortlessly. Make sure to copy it before closing the window.
⚠️ Important: All active sessions for this mailbox (webmail, Outlook, mobile devices) will be disconnected as soon as the password is changed. The user will need to enter the new password on each device and application.
Delete a mailbox
Deletion is irreversible. All messages stored in this mailbox will be permanently removed from the server, with no possibility of recovery.
Procedure:
- Open the edit page of the mailbox you want to delete.
- Scroll down to the deletion section at the bottom of the page.
- Read the warning — it confirms that all messages will be deleted.
- Click Delete to confirm.
Search and filter your addresses
When your domain includes multiple mailboxes and forwards, the dashboard’s search bar and filters will save you time:
- Search bar: type part of an address, an alias, or a forwarding destination to instantly filter the list.
- Type filters: display only mailboxes, only standalone forwards, or both.
- Sort by storage: click the Storage column header to sort mailboxes by size — useful for identifying those growing unusually fast.
FAQ — Frequently Asked Questions
- Check that SPF shows Configured on the dashboard.
- Check that DKIM shows Active.
- If both are correct but the issue persists, DNS propagation may still be in progress — wait up to 48 hours.
- After 48 hours with no improvement, open a support ticket and include a screenshot of your dashboard
Technically, no. But in practice, without these two records, Gmail, Outlook.com, and most major providers treat your emails with suspicion — and some (or all) may end up in spam.
The setup is done once, takes less than ten minutes, and permanently protects your sender reputation. It’s the first thing you should configure.
An alias is a second name for the same mailbox — messages arrive in the same place regardless of which address is used.
A forward routes messages to an external address — they leave your server and are delivered elsewhere.
If you delete the main mailbox, its aliases are deleted as well. A standalone forward, on the other hand, exists independently.
As the domain administrator, you can reset the password of any mailbox from the client area without knowing the current one.
Follow the procedure described in the section “Change a mailbox password.”
Yes. info@, contact@, and support@ can all point to the same mailbox or external address.
Each forward is managed independently — you can modify or delete one without affecting the others.
New incoming messages will be rejected, and the sender will receive an error message.
To resolve this:
- Free up space by deleting emails via webmail
- Increase the limit from the edit page, or
Yes — and it’s recommended if the user relies on both a mobile device and Microsoft Outlook.
Both protocols work simultaneously without interference. A discounted combined rate is automatically applied (see your dashboard for exact pricing).
Everything is now in your hands
Addresses, aliases, forwards, SPF, DKIM, ActiveSync — everything can be configured in just a few clicks from your client area, with no middleman.
If you haven’t set up your SPF and DKIM yet, start there: go to your dashboard and follow the steps. It’s the change that will have the most immediate impact on your email deliverability.
Ready for a professional email that reflects your brand?
Our email hosting plans include everything covered in this guide: unlimited addresses, built-in SPF and DKIM, ActiveSync and MAPI available per mailbox, and full management from your client area.
Have questions before getting started? Our team is available through the ticket system in your client area.
Leave a Reply