
Minecraft Bedrock is the edition that lets players on Windows, Android, iOS, Xbox and PlayStation meet in the same world. This tutorial installs a Minecraft Bedrock server on Ubuntu 26.04 LTS — Mojang’s official software, not a fork — as a permanent service: it starts with the machine, restarts itself after a crash, backs itself up every night and updates with a single command.
Every command uses absolute paths, so you can paste them one after another without ever wondering which directory you are in.
What has changed since our Ubuntu 20.04 tutorial
Four things, and they matter:
- The firewall rules are no longer the same at all. Mojang replaced the original network transport (RakNet, on UDP 19132) with NetherNet, which listens on TCP 19132 for the handshake and then opens one UDP port per player. The old tutorial’s
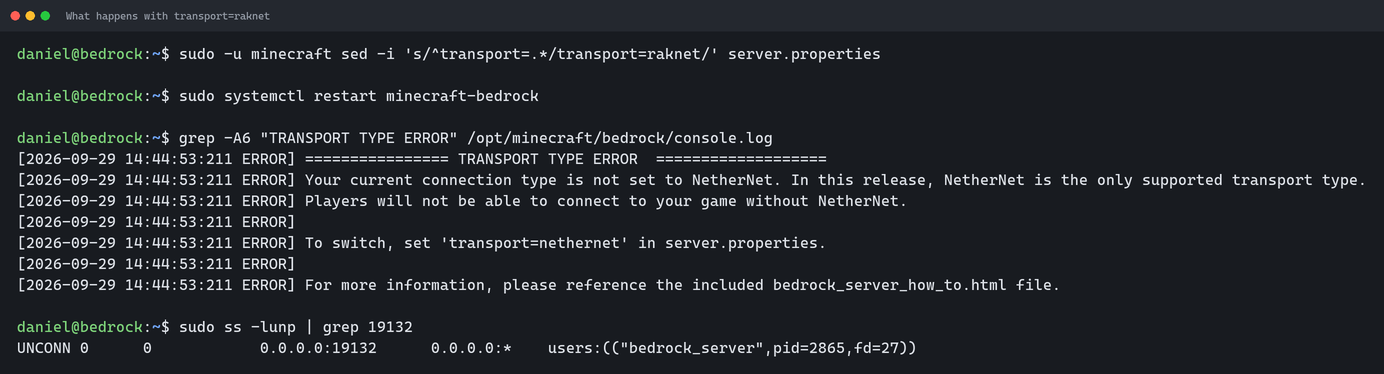
ufw allow 19132/udprule no longer opens anything useful. Worse, the server now refuses the old mode: set toraknet, it writes in its log that NetherNet is the only supported transport type in this release and that players will not be able to connect. Sections 3 and 6 account for both changes. - The download address has changed. The old
minecraft.azureedge.nethost no longer exists at all. Our command now looks up the current release in Mojang’s official index, so this tutorial will not go stale. - No more
libssl1.1workaround. Many guides still have you install an old OpenSSL library. It is no longer needed: the current server depends only on the system C library, and Ubuntu 26.04 ships one far newer than the minimum required. - The allow list is now on by default. A freshly installed server turns everyone away until you add players to it (section 7). This is the number one cause of “it doesn’t work” on recent servers.
What you need
- An Ubuntu 26.04 LTS server on x86-64 hardware (Intel or AMD). Mojang does not publish an ARM build of the Bedrock server, so an ARM VPS will not work. If you don’t have a server yet, have a look at our virtual servers.
- 2 cores and 1 GB of memory at a minimum, which is what Mojang recommends. Plan on 2 GB from four or five simultaneous players onward.
- SSH access to the server with a user who can run
sudo. - The Xbox gamertag of everyone who will play: you’ll need them for the allow list.
A note on licensing. The Bedrock server is free but proprietary software. By downloading it you accept the Minecraft End User Licence Agreement and the Microsoft privacy statement. The server also sends Mojang a report automatically if it crashes.
1. Update the server
Always start here. The first sudo command of the session will ask for your password.
sudo apt update && sudo apt full-upgrade -y
If the kernel was updated, a reboot is needed. This command reboots only if Ubuntu asks for one:
if [ -f /var/run/reboot-required ]; then echo "Rebooting in 5 seconds..."; sleep 5; sudo reboot; else echo "No reboot required."; fi
Reconnect over SSH if the server rebooted, then carry on.
2. Install the required packages
Four packages only: unzip to extract the archive, screen to keep the server console reachable, openssl for the server identity, and ufw for the firewall.
sudo apt install -y unzip screen openssl ufw
Watch out for curl. Microsoft’s content delivery network refuses requests whose user agent starts with curl/: a curl -O on the server file hangs without ever answering. This tutorial uses wget, which goes through fine.
3. Configure the firewall
The order matters: allow SSH before enabling the firewall, or you will lock yourself out. The --force flag avoids the y/n prompt that would stall a paste.
sudo ufw default deny incoming
sudo ufw default allow outgoing
sudo ufw allow OpenSSH
sudo ufw allow 19132/tcp comment 'Bedrock NetherNet signalling'
sudo ufw allow 19140:19180/udp comment 'Bedrock NetherNet gameplay'
sudo ufw --force enable
sudo ufw status verbose
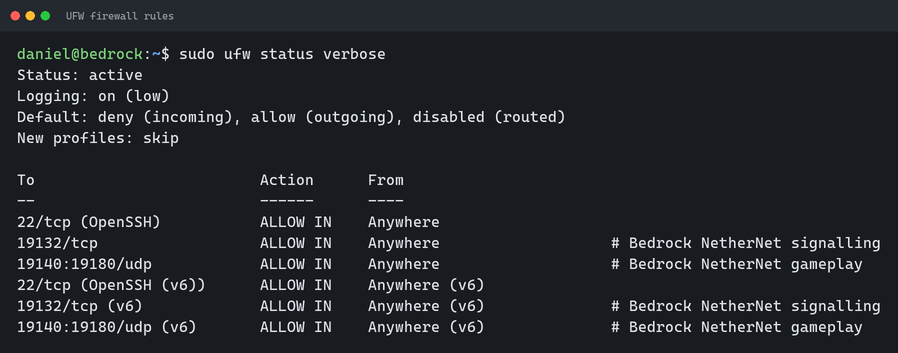
Two rules, because NetherNet uses two channels: TCP 19132 carries the initial handshake, and every connected player then gets a UDP port from the range we will set in section 6. Forty ports is plenty for a family server; widen the range — on both sides, here and in server.properties — if you expect a crowd.
If you have already moved your SSH port, replace OpenSSH with <your port>/tcp — and read appendix A, because the method has changed on Ubuntu 26.04.
4. Create the user and the directories
The game server must never run as root. We create a system user with no password and no login shell: nobody can open a session as that user, but the service runs perfectly well.
sudo useradd --system --create-home --home-dir /opt/minecraft --shell /usr/sbin/nologin minecraft
sudo mkdir -p /opt/minecraft/bedrock /opt/minecraft/backups
sudo chown -R minecraft:minecraft /opt/minecraft
sudo chmod 755 /opt/minecraft
sudo chmod 750 /opt/minecraft/backups
The last two lines deserve a word. useradd creates the home directory in mode 750, which would stop you reading your own configuration files without sudo on every command. So we open it for reading while keeping the backups closed — and the private key from section 8 will stay readable by the minecraft account alone.
5. Download the latest server release
This command asks Mojang for the address of the current release, prints it, then downloads it. No version number to copy by hand, and nothing in this tutorial to update as Minecraft moves on.
LINK=$(wget -qO- https://net-secondary.web.minecraft-services.net/api/v1.0/download/links | grep -o 'https://[^"]*bin-linux/bedrock-server-[0-9.]*\.zip')
echo "Release found: $LINK"
wget -O /tmp/bedrock-server.zip "$LINK"
Extract, set permissions, and record the installed version for the update script in section 14:
sudo unzip -o /tmp/bedrock-server.zip -d /opt/minecraft/bedrock
basename "$LINK" .zip | sed 's/bedrock-server-//' | sudo tee /opt/minecraft/bedrock/version.txt
sudo chown -R minecraft:minecraft /opt/minecraft
sudo chmod +x /opt/minecraft/bedrock/bedrock_server
rm -f /tmp/bedrock-server.zip
6. Configure the server
This is the most important section of the tutorial. The server.properties file holds about forty settings; these commands change only the ones that matter, leaving the rest of the file and its comments untouched.
sudo -u minecraft sed -i \
  -e 's/^server-name=.*/server-name=My Bedrock Server/' \
  -e 's/^gamemode=.*/gamemode=survival/' \
  -e 's/^difficulty=.*/difficulty=normal/' \
  -e 's/^max-players=.*/max-players=10/' \
  -e 's/^level-name=.*/level-name=World/' \
  /opt/minecraft/bedrock/server.properties
What remains is to pin the UDP port range. Without it the server picks at random from the system’s ephemeral ports every time a player connects — and your firewall blocks them. The property is not in the shipped file, so we add it:
grep -q '^server-udp-ports=' /opt/minecraft/bedrock/server.properties || echo 'server-udp-ports=19140-19180' | sudo -u minecraft tee -a /opt/minecraft/bedrock/server.properties
Check the result:
grep -E '^(transport|server-name|server-port|server-udp-ports|gamemode|difficulty|max-players|allow-list|level-name)=' /opt/minecraft/bedrock/server.properties
You should read transport=nethernet and server-udp-ports=19140-19180. That range must match exactly the one opened in the firewall in section 3: it is the pair of them that makes the server reachable.
What about the old raknet mode? You can still select it, and it does reopen UDP 19132 the way it used to — but the server then writes this error in its log: “In this release, NetherNet is the only supported transport type. Players will not be able to connect to your game without NetherNet.” The ports open, and nobody gets in. Don’t use it.
A few useful settings, if you want to go further in the same file:
| Setting | Effect | Values |
|---|---|---|
| — | — | — |
server-name | The name shown in the game’s server list | Free text, no semicolons |
server-port | TCP port of the handshake — this is the one your players type | 19132 by default |
server-udp-ports | UDP range for gameplay; must mirror the firewall rule | 19140-19180 |
level-name | The name of the world folder on disk, not the displayed name | Free text |
level-seed | The world seed, to reproduce a known terrain | Empty = random |
gamemode | Default game mode | survival, creative, adventure |
difficulty | Difficulty | peaceful, easy, normal, hard |
allow-cheats | Lets operators use in-game commands | true, false |
view-distance | View distance, in chunks (direct impact on load) | 32 by default |
player-idle-timeout | Minutes before an idle player is kicked | 30 by default |
A change in this file needs a service restart (section 10). Two exceptions can be changed live from the console: difficulty and allow-cheats, with the changesetting command.
7. Allow your players in
The allow-list setting is true from the moment you install: the server turns away anyone who is not in allowlist.json. Replace the two example names with your players’ exact Xbox gamertags — case and spaces matter.
sudo -u minecraft tee /opt/minecraft/bedrock/allowlist.json >/dev/null <<'JSON'
[
  { "ignoresPlayerLimit": false, "name": "YourGamertag" },
  { "ignoresPlayerLimit": false, "name": "AFriendsGamertag" }
]
JSON
To add someone later, without touching the file or restarting, see section 12.
Would you rather run an open server? Replace the list with sudo -u minecraft sed -i 's/^allow-list=.*/allow-list=false/' /opt/minecraft/bedrock/server.properties. Be aware that bots will find your IP address within hours: we do not recommend it.
8. Create the server identity key
Without this key the server invents a new identity at every start, and your players have to re-accept the server’s trust prompt each time. A permanent key settles it for good. Mojang requires an unencrypted EC P-384 key.
sudo -u minecraft mkdir -p /opt/minecraft/bedrock/keys
sudo -u minecraft openssl ecparam -name secp384r1 -genkey -noout -out /opt/minecraft/bedrock/keys/server_identity_key.pem
sudo chmod 700 /opt/minecraft/bedrock/keys
sudo chmod 600 /opt/minecraft/bedrock/keys/server_identity_key.pem
This key is a secret: keep it with your backups, and do not share it.
9. Install the systemd service
The service does three things the old manual screen method did not: it starts the server when the machine boots, it restarts it after a crash, and above all it stops it cleanly. That last point is essential: the Bedrock server only saves its world on the stop command. Killing the process without sending it risks losing the last session, or corrupting the world.
That is why there are two ExecStop lines. The first sends stop to the server console; the second waits for it to finish. Without that second line, systemd considers the shutdown complete as soon as the command is sent and kills the server right after, before it has had time to write the world to disk. The -Logfile option keeps everything the server prints in a file you can read at your leisure.
sudo tee /etc/systemd/system/minecraft-bedrock.service >/dev/null <<'UNIT'
[Unit]
Description=Minecraft Bedrock server
Documentation=https://www.minecraft.net/en-us/download/server/bedrock
After=network-online.target
Wants=network-online.target

[Service]
Type=simple
User=minecraft
Group=minecraft
WorkingDirectory=/opt/minecraft/bedrock
Environment=LD_LIBRARY_PATH=/opt/minecraft/bedrock
ExecStart=/usr/bin/screen -L -Logfile /opt/minecraft/bedrock/console.log -DmS bedrock /opt/minecraft/bedrock/bedrock_server
ExecStop=/usr/bin/screen -S bedrock -p 0 -X eval "stuff \"stop\\015\""
ExecStop=/bin/sh -c "while pgrep -x bedrock_server >/dev/null; do sleep 1; done"
TimeoutStopSec=120
Restart=on-failure
RestartSec=15
NoNewPrivileges=true
ProtectSystem=full
ProtectHome=true
ReadWritePaths=/opt/minecraft

[Install]
WantedBy=multi-user.target
UNIT
sudo systemctl daemon-reload
10. Start it and check
sudo systemctl enable --now minecraft-bedrock
sleep 20
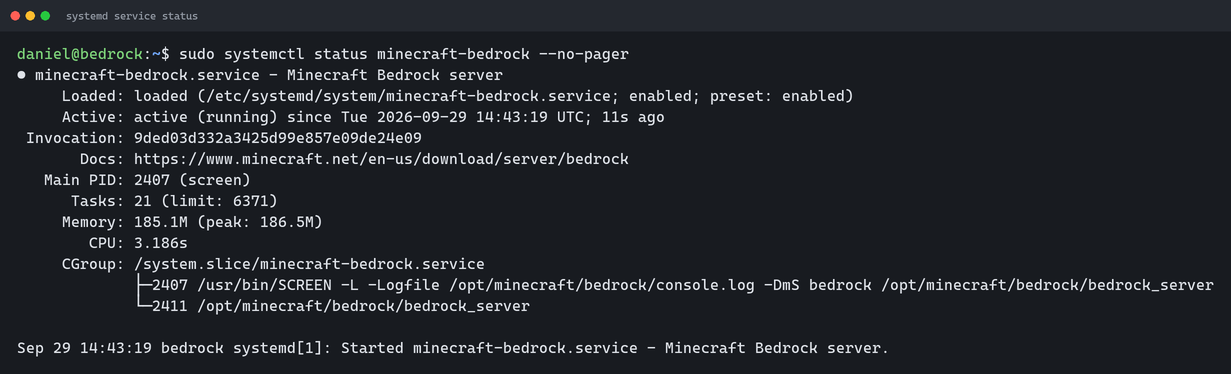
sudo systemctl status minecraft-bedrock --no-pager
The status must read active (running). The first start creates the world, so it takes a few seconds longer than the ones after it.
Now check that the server is really listening where it should:
sudo ss -ltnp | grep 19132
You should see one LISTEN line on port 19132, held by bedrock_server. If this command returns nothing, the server did not start: see the log in section 15.
Don’t go looking for a UDP port in listening state — there is none as long as nobody is playing. NetherNet only opens a UDP port when a player connects, within the range set in section 6. This is normal, and it is why the firewall rule covers a range rather than a single port.

One last check, to run from another machine than the server — it proves the firewall lets the handshake through. Replace the address with your own:
curl -s -o /dev/null -w 'HTTP status: %{http_code}\n' http://YOUR-IP-ADDRESS:19132/
A 404 is the right answer: the server replied. A connection error or no answer at all means the port is not reachable — go back to section 3.

And the address to give your players:
ip -4 addr show scope global | grep -oP '(?<=inet\s)\d+(\.\d+){3}'
The day-to-day commands:
sudo systemctl restart minecraft-bedrock   # restart (saves the world first)
sudo systemctl stop minecraft-bedrock      # stop cleanly
sudo systemctl start minecraft-bedrock     # start
11. Connect from Minecraft
In the game: Play → Servers → Add Server.
| Field | Value |
|---|---|
| — | — |
| Server name | Whatever you like |
| Server address | The IP address from section 10 |
| Port | 19132 |
The first player to join has to accept the server’s trust prompt. Thanks to the key from section 8, they will only do it once.
Consoles. Xbox, PlayStation and Switch do not let you add a server by address in the game’s interface. Console players have to go through a third-party DNS redirection service, or join the game of a friend already connected from a computer or a phone.
12. The server console and the everyday commands
Most of the time all you need is to read what the server is saying — joins, leaves, errors. The file is right there, and you don’t even need sudo:
tail -f /opt/minecraft/bedrock/console.log
Ctrl-C to leave. Note that screen writes this file in bursts: a line can take ten seconds or so to appear. That is not a hang.

To talk to the server, attach to its console:
sudo -u minecraft screen -x bedrock
To leave without stopping the server: Ctrl-A then D. Never type stop in the console just to get out — that would shut the server down.
You can also send a command without attaching at all. Replace the text between quotes, keeping the \015 at the end (that is the Enter key):
sudo -u minecraft screen -S bedrock -p 0 -X eval 'stuff "allowlist add ANewPlayer\015"'

The most useful commands, to type in the console or send this way:
| Command | Effect |
|---|---|
| — | — |
allowlist add <gamertag> | Adds a player to the allow list, and writes them to the file |
allowlist remove <gamertag> | Removes them |
allowlist list | Prints the active list |
allowlist reload | Reloads the file after editing it by hand |
op <player> | Grants operator rights (persistent) |
deop <player> | Revokes them |
kick <player> <reason> | Kicks a player, with a message |
changesetting difficulty hard | Changes the difficulty without restarting |
changesetting allow-cheats true | Enables in-game commands |
stop | Stops the server, saving the world |
13. Back up automatically
One backup a night, kept for two weeks. The script stops the service for the few seconds it takes to copy the world — which guarantees a consistent copy — then starts it again only if it was running before.
sudo tee /usr/local/sbin/minecraft-backup >/dev/null <<'SCRIPT'
#!/bin/bash
set -euo pipefail
DEST=/opt/minecraft/backups
SOURCE=/opt/minecraft/bedrock
WAS_RUNNING=no
if systemctl is-active --quiet minecraft-bedrock; then
  WAS_RUNNING=yes
  systemctl stop minecraft-bedrock
fi
mkdir -p "$DEST"
ARCHIVE="$DEST/bedrock-$(date +%Y-%m-%d-%H%M).tar.gz"
tar -czf "$ARCHIVE" -C "$SOURCE" worlds server.properties allowlist.json permissions.json keys
chmod 600 "$ARCHIVE"
if [ "$WAS_RUNNING" = yes ]; then
  systemctl start minecraft-bedrock
fi
find "$DEST" -name 'bedrock-*.tar.gz' -mtime +14 -delete
echo "Backup complete: $ARCHIVE"
SCRIPT
sudo chmod +x /usr/local/sbin/minecraft-backup
The service and the timer that call it every night at 4:30:
sudo tee /etc/systemd/system/minecraft-backup.service >/dev/null <<'UNIT'
[Unit]
Description=Minecraft Bedrock server backup

[Service]
Type=oneshot
ExecStart=/usr/local/sbin/minecraft-backup
UNIT
sudo tee /etc/systemd/system/minecraft-backup.timer >/dev/null <<'UNIT'
[Unit]
Description=Nightly backup of the Minecraft Bedrock server

[Timer]
OnCalendar=*-*-* 04:30:00
Persistent=true

[Install]
WantedBy=timers.target
UNIT
sudo systemctl daemon-reload
sudo systemctl enable --now minecraft-backup.timer
To test it right away, and to see the next scheduled run:
sudo /usr/local/sbin/minecraft-backup
systemctl list-timers minecraft-backup --no-pager
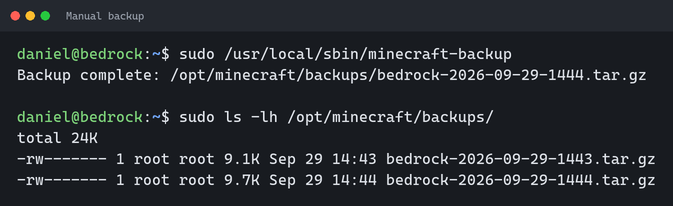
The backup directory is closed to other users, since the archives contain the identity key. To see what you have:
sudo ls -lh /opt/minecraft/backups/
A backup that stays on the same machine does not protect you from losing the server: copy this directory elsewhere from time to time.
To restore a world:
sudo systemctl stop minecraft-bedrock
sudo -u minecraft tar -xzf /opt/minecraft/backups/ARCHIVE-NAME.tar.gz -C /opt/minecraft/bedrock
sudo systemctl start minecraft-bedrock
14. Update the Bedrock server
When Minecraft updates, players cannot get in until the server follows. This script compares the installed version with the one Mojang publishes, backs up, updates if needed, and touches neither the world, nor your configuration, nor the allow list.
sudo tee /usr/local/sbin/minecraft-update >/dev/null <<'SCRIPT'
#!/bin/bash
set -euo pipefail
API=https://net-secondary.web.minecraft-services.net/api/v1.0/download/links
TARGET=/opt/minecraft/bedrock

LINK=$(wget -qO- "$API" | grep -o 'https://[^"]*bin-linux/bedrock-server-[0-9.]*\.zip' || true)
if [ -z "$LINK" ]; then
  echo "Could not obtain the official download link." >&2
  exit 1
fi
LATEST=$(basename "$LINK" .zip | sed 's/bedrock-server-//')
INSTALLED=$(cat "$TARGET/version.txt" 2>/dev/null || echo unknown)
if [ "$LATEST" = "$INSTALLED" ]; then
  echo "Already up to date (version $INSTALLED)."
  exit 0
fi

echo "Updating: $INSTALLED -> $LATEST"
/usr/local/sbin/minecraft-backup
wget -qO /tmp/bedrock-update.zip "$LINK"
systemctl stop minecraft-bedrock
unzip -oq /tmp/bedrock-update.zip -x server.properties allowlist.json permissions.json -d "$TARGET"
echo "$LATEST" > "$TARGET/version.txt"
chown -R minecraft:minecraft "$TARGET"
chmod +x "$TARGET/bedrock_server"
systemctl start minecraft-bedrock
rm -f /tmp/bedrock-update.zip
echo "Server updated to version $LATEST."
SCRIPT
sudo chmod +x /usr/local/sbin/minecraft-update
Run it whenever you like:
sudo /usr/local/sbin/minecraft-update

We suggest running it by hand, once you have checked that the update doesn’t break anything for your players, rather than automating it.
15. Troubleshooting
| Symptom | Most likely cause | Fix | |
|---|---|---|---|
| — | — | — | |
| “Unable to connect to world” | TCP port 19132 is not reachable from outside | The curl test in section 10, then the firewall rule in section 3 | |
| The player connects, then is dropped immediately | UDP range closed, or different from server-udp-ports | The firewall range (section 3) and the file’s range (section 6) must be identical | |
| The log shows “TRANSPORT TYPE ERROR” | transport set to raknet | Set it back to nethernet (section 6), then restart the service | |
| `sudo ss -ltnp \ | grep 19132` returns nothing | Service stopped or failed | systemctl status, then the log |
| The player sees the server but is refused entry | Gamertag missing from the allow list, or misspelled | Section 7, then allowlist reload | |
| “You have to accept the server’s trust prompt” at every restart | Identity key missing | Section 8 | |
| The download hangs with no message | Request made with curl | Use wget, as in section 5 | |
bedrock_server: cannot execute binary file | ARM server (aarch64) | There is no ARM build; you need an x86-64 machine | |
| The service restarts in a loop | Corrupted world, not enough memory | Read the server log: tail -50 /opt/minecraft/bedrock/console.log | |
| The world lost the last session played | Process killed without the stop command | Always go through systemctl stop or restart | |
systemctl stop ends in “FAILURE” instantly | The second ExecStop line is missing from the service | Section 9: without it, systemd kills the server before it saves |
Two logs not to confuse: systemctl tells you about the service, and console.log about what the game server itself is saying. It is almost always the second one that holds the answer.
tail -50 /opt/minecraft/bedrock/console.log
sudo systemctl status minecraft-bedrock --no-pager
sudo ufw status verbose
Appendix A — Changing the SSH port on Ubuntu 26.04
Moving SSH to another port cuts the noise from bots enormously. Careful: since Ubuntu 22.10, changing Port in /etc/ssh/sshd_config does nothing at all — the service is socket-activated by systemd, and it is the socket that decides the port. This is the main difference from our Ubuntu 20.04 tutorial.
Keep your current SSH session open throughout, and test the new one before closing the old. Here, port 22222:
sudo ufw allow 22222/tcp comment 'SSH'
sudo mkdir -p /etc/systemd/system/ssh.socket.d
sudo tee /etc/systemd/system/ssh.socket.d/port.conf >/dev/null <<'CONF'
[Socket]
ListenStream=
ListenStream=22222
CONF
sudo systemctl daemon-reload
sudo systemctl restart ssh.socket
sudo ss -ltnp | grep 22222
Open a second terminal and check that the connection works: ssh -p 22222 user@address. Once that is confirmed, close the old port:
sudo ufw delete allow OpenSSH
sudo ufw status verbose
Appendix B — Understanding the transport change
If you set up a Bedrock server a few years ago, section 3 probably surprised you: where did the famous “UDP 19132” go?
It used to be RakNet. The server listened directly on UDP 19132 (IPv4) and 19133 (IPv6). The client sent a packet to that address, the server answered, and that was that. A single firewall rule was enough, and monitoring tools could query a server to find out whether it was alive.
Today it is NetherNet, built on WebRTC. The server opens a dual-stack TCP socket on server-port and speaks HTTP on it: that is the handshake. Along the way, client and server agree on a separate UDP connection, whose port comes from the server-udp-ports range, and that connection carries the game. Hence the two firewall rules, and hence the fact that no UDP port shows up as listening while the server is idle.
Three practical consequences:
server-portv6no longer does anything under NetherNet — a single dual-stack socket serves IPv4 and IPv6 at once. The property stays in the file, simply ignored.- Server lists and monitoring tools that query the old UDP port will not see your server. To check that it is alive, use the
curltest from section 10. - Mojang recommends a reverse proxy (nginx, HAProxy) in front of the signalling port for an internet-facing server, since it is ordinary HTTP traffic: that lets you apply rate limits. It is not necessary for a family server, but it is worth considering if yours becomes popular.
The raknet mode still exists in server.properties, and it does reopen the old UDP ports. But the server writes an explicit error in its log — in this release, NetherNet is the only supported transport type — and players cannot connect. Don’t count on it.
References
- Bedrock Dedicated Server — official download page
- Official documentation: the
bedrock_server_how_to.htmlfile, shipped inside the server archive, in/opt/minecraft/bedrock - Bedrock Dedicated Server bug tracker (Mojang)
- Ubuntu release cycle
- Minecraft End User Licence Agreement
- Our virtual servers
- Our 2021 tutorial, for Ubuntu 20.04: kept for reference, but no longer usable — the download address it gives has disappeared, and its firewall rules predate the protocol change.
The screenshots in this article come from a real installation on Ubuntu 26.04 LTS, made by following these very steps. The IP address in them is replaced by an address reserved for documentation.

Leave a Reply